Non-Messy Sunday School Crafts That Are Kid-Approved
Sometimes, the mess is just unavoidable, let us all admit it, but other times it can surprisingly be avoided. Provided below are 7 non-messy kid-approved Sunday School crafts to help you with ideas for those times where you can control some of the elements of the "mess." In reality, the "mess" will pay off, and the mess creates the moments and memories. So do your best and forget the rest, but we will help you avoid as much of the mess as we can!
Ziploc Bag Painting
From nursery to late Elementary, your kids will for sure approve of this fun, non-messy craft! All the kids have to do is pick their colors, shake and squish the bag, and well….their work is done! Hang them to dry for a week or do the craft at the beginning of class, so they are dried and ready to go when they leave. Either way, the kids leave with a fun work of art and no mess!

SUPPLY LIST
-Ziploc bags (1 per kid)
-Sheets of paper (1 per kid)
-Acrylic paint colors (all the colors you want as options)
-String and clothespins to hang the photos to dry
-A few paper towels
INSTRUCTIONS
Give each kid a Ziploc bag and a piece of paper small enough to fit inside.
Have them choose the paint colors they want to use (the number of colors just really depends on how diverse you want the painting to be).
Write their name on their paper.
Squirt a dab of paint for each color they want to use onto the piece of paper.
Place it in the Ziploc bag.
Let them go to town shaking, smushing, pushing, playing, etc.
With paper towels handy, have one leader in charge of removing the paintings from the bags to hang; unless you keep them for the week, you can just take the Ziploc bags and remove them later when everyone has left.
Rainbow on a Stick
This non-messy craft is a great way to use up those expired marshmallows you have laying around, OR it is a great craft to make the day you tell the kids the story of Noah's Ark! Either way, the only mess you will have is the cereal that fell on the ground that didn't get eaten first. YUM! Enjoy!

SUPPLY LIST
-1 pipe cleaner per kid
-Fruit Loops type cereal (If you want them to make an actual rainbow get 6 of each color, if not, each kid just needs 36 pieces of cereal to complete the average-sized pipe cleaner)
-Paper plate
-Glue gun or regular glue could work too
-2 big marshmallows
-1 paper plate per kid
INSTRUCTIONS
Warm-up glue gun (if using).
Give each kid supplies.
Push one side of the pipe cleaner into one of the marshmallows.
Start placing the cereal through the pipe cleaner; 36 pieces are good, safe, and even number to put on.
Once all the cereal is on, stick the end of the pipe cleaner into the marshmallow.
Glue both marshmallows to the paper plate.
Write their names on their plates.
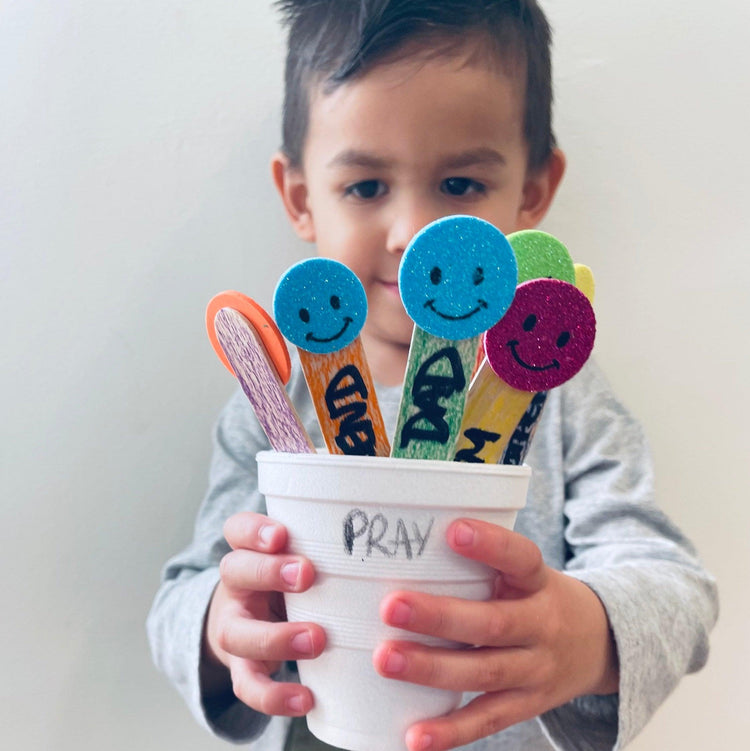
Prayer Popsicle
Prayer popsicles are a fun and simple craft to make for kids to take home as reminders of who they can pray for! No mess, and they get to color something other than paper! The sticks can be colored simply with crayons, or you can take it up a notch and have them color with markers or paint and put stickers on the sticks.

SUPPLY LIST
-1 paper cup per kid
-Popsicle stick
-Crayons
-Stickers (optional)
INSTRUCTIONS
If you want to make things easy right out the gate, you can write their name and "Pray" or "Prayers" on their cup first.
Give each kid a cup and a handful of popsicle sticks, crayons, and stickers.
Have them color and decorate the popsicle sticks and cups any way they would like.
Then ask them who they want on their prayer sticks to remember to pray for.
Write the names out for them of who they want to pray for.
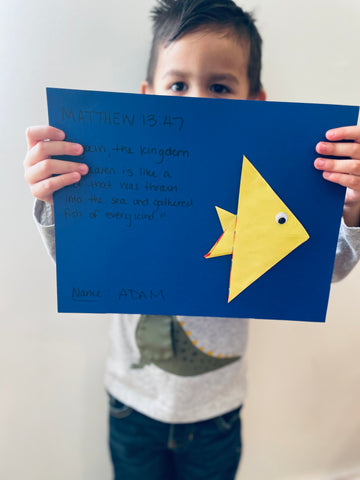
Fold -A- Fish
This may take a little more "work" on your part, but there is for sure less mess with this Fold-A-Fish origami-style craft. You can pre-fold the papers, so it only takes them a few fewer steps to make, or you can all fold them step by step together. Either way, this kid-approved craft is easy and fun to do, along with any lesson you tell on fish from the Bible!
SUPPLY LIST
-Origami/square paper
-Googly eyes – or you can draw an eye on your fish
-Markers to write on the paper/draw on the fish
-Construction or brightly colored paper to glue the fish to
-Glue of any kind
INSTRUCTIONS
Fold the paper diagonally once and then diagonally in the other direction again. It should look like you have an X on your paper. (See photo)
Then fold the paper in half. (See photo)
Fold the right bottom corner of one side in. (See photo)
Then do the same to the other side. (See photo)
Put an eye on the fish any way that you choose.
Glue the fish to the big piece of paper.
Put their name, a verse, the date, etc., anything you would like on their paper as their take home.
Hand Tracing
What kid doesn't approve of tracing? And what parent doesn't love a handprint? This effortless craft is excellent for a Sunday with a fun memory verse to write at the top, or you could ask the kids for their favorite memory verse, OR you could even do this as a Father's/Mother's Day craft! Either way, it's an all-around win!

SUPPLY LIST
-Crayons
-Marker
-Colored Paper
INSTRUCTIONS
Prewrite with the marker the name, date (and Bible verse reference if applicable) on the sheets of paper to save on time.
Give the kids the crayons and have them trace their hands on the paper.
Write in their names, and if you have not already, the date as well on the paper.
Tissue Paper Shape (Cross, Heart, Star)
Tissue paper is an inexpensive and fun colorful craft supply that is easy to get your hands on if you do not already have some. Take some of that scrap tissue paper and rip it up or let the kids help rip it up and stick it to the contact paper that you precut into any shape that fits your lesson that day!
SUPPLY LIST
-Any color tissue paper
-Scissors
-Contact paper
-Hole puncher
-String
INSTRUCTIONS
Gather tissue paper and cut/rip it up into small pieces.
Cut contact paper into the desired shape.
Peel off backing.
Allow children to stick tissue paper on anywhere they would like.
Hole punch anywhere you desire for a string hanger.
Tie string into hole.
Color Bookmark
This can be a great craft to do to give out on a Sunday where you give out books or talk about reading their Bibles. You can write their name on it, a Bible verse you are learning, the date, etc. This craft is fantastic for any age and is a great time filler. It can get as simple or complex as you need.

SUPPLY LIST
-Construction Paper
-Hole Punch
-String
-Marker
-Crayons
INSTRUCTIONS
Cut a bookmark-shaped piece of paper out of your construction paper.
Write what you want to use to identify each kid.
Give kids coloring options and bookmarks and let them color what they want on their bookmarks.
Hole punch and tie a string on top for easy grabbing.